Adsense


Friday, 31 August 2012

Because my Mummy Did

You know the old saying, at some point or another we all turn into our mother's.

Well I don't know about that but more and more I realize the apple doesn't fall far from the tree, and I find myself from at times doing things and later think, I have no idea why I did that, it's just simply because my Mum did/does it. That's what this project is about.

A Quilted (Pointless) Laundry Mat


I remember Mum having mats in our laundry, but after I made this, I looked at it and thought, this is a wet area, why do I want to add something to the floor that is is going to require washing and cleaning? Well it's made now, so it's going in there.

Speaking of my Mum, she is a glorious quilter, I mean, she makes the MOST stunning quilts, while I on the other hand prefer to fake it and go for whatever is the easiest option. I am, under Mum's careful eye, currently making my first real quilt, complete with binding. I'll share it with you when I finish. I should add that I bought the squares pre cut, in January. I will finish it, Mum will make sure of it!

Anyway back to the pointless mat, that I will have to wash and the kids will walk all over with dirty shoes and I will regret making it for the rest of it's functioning life.

Supplies:
Assorted fabric, I had on hand
Quilt Batting
Sewing machine/Overlocker, (aka for my American friends, a Serger)
Sewing supplies
Basting spray

I cut out the 4&1'2 inch squares (when it comes to sewing I don't use metric)


Decided how I wanted them laid out


Walked away, Madeleine messed them up and so I did it again

The culprit, now behind bars (blurry because she was moving)


Sewed into strips, then sewed them together to get that diagonal pattern
Basted the batting and cut the fabric for the back. I baste with basting spray, because again, it's the cheaters easiest way to do it, then I'll add a couple of pins, just in case.

Quilted it in the ditch. If you've never done this because "in the ditch" scared you, I'm going to say do it, it's actually pretty easy


Then instead of binding it, I overlocked (serged) all the edges.


Here she is, The Pointless Laundry Mat.


DIY Delight or Disaster?

Well even though it is pointless, I like the pattern so I'm going with delight. What do you think? Do you have any pointless items or habits, that you do only because your folks did it?

Oh and here's a close up of some awesome fabric


Thanks for reading,

Mel xo

Thursday, 30 August 2012

Horsing Around

Hello Everyone!

A clothes horse holder


If you're a new reader, welcome to the crazy train that is my mansion  a quick joke for you.

A horse walks into a bar and the bartender says "Why the long face?"

Yep it's a Dad joke. Not sure if Dad jokes are international, but basically any short, quick, mostly unfunny but clean joke is what we call a Dad joke. However in house it was always a Grandpa joke, because my Grandpa ALWAYS had a stupid joke for us followed by a goofy grin, when we would all groan at the punchline.

Anyway, no jokes,  this is quick and has turned out to be very useful.

Supplies

Fabric Scraps
A lump of wood - I used a scrap I found in the garage, size it to what you want
Hooks

I had scraps left over from cutting out the shapes on the ABIB, which already had heat and bond on the back, so I cut them into strips and ironed them straight onto the wood, but you could glue or mod podge them.


Grabbed two hook and screwed them in and drilled it into the wall


Again, apologies for the photos, the laundry sucks for photos almost as much as I do at editing them.


Honestly this was so quick and now I don't have the clatter of them banging around in there when I'm trying to do stuff, I'd got to the point where I was keeping them in the family room because they were annoying me so much in the laundry.

DIY Delight or Disaster? I'm not a huge fan of how the strips look, if I was going to do it again, I'd use one piece of fabric, but as a functioning organisational piece, it's brilliant and it cost me $2 to make! I'm marking this in the diary as a Delight!

See what I mean about keeping it all together


Oh and hey, if you're enjoying life here at that mansion, why not follow along on Google Friend Conect, or here on FaceBook

Thanks for reading,

Mel xo

Wednesday, 29 August 2012

A Framed Iron Holder

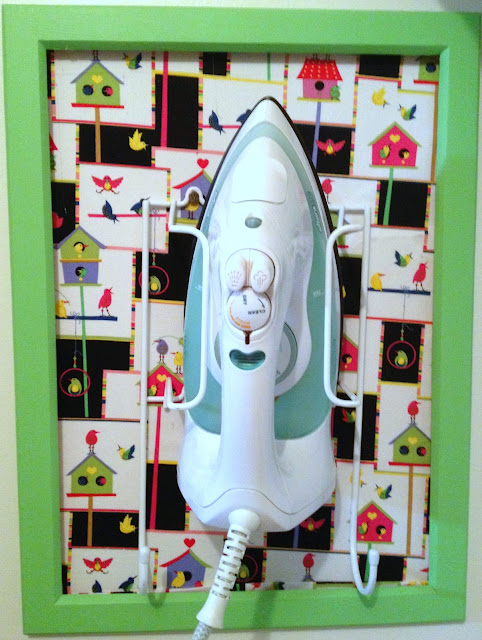
Today's project: An Iron Holder


Since the making of the ABIB, my iron has been whining about the fact that he doesn't feel he fits in anymore. Rest assure, my iron is a man. I mean, what woman in her right mind would own up to inventing the iron. Are wrinkles really that bad?

Which brings me to botox, when I was thirty I considered botox, not because I had any wrinkles but I thought I'd get a jump start and maybe slow the aging process. Well before I got around to it, I met a woman who had "some work" and honestly she looked 10 years older than her age and kind of like death warmed up....I decided aging might not be too bad, until I was referred to as geriatric!

 When I was pregnant with my last baby, Max, I was in need of some extra tests because I was an "older woman". The doctor said he would like them done right away to rule out possible complications, terrified I replied "sure, whenever you can get me in". So the doctor, who himself was about 25, gets on the phone and says "I need to order some tests, these are urgent I'm treating a geriatric mother." I was mortified, I'm not a violent woman but let me tell you, at 6 months pregnant I wanted to get up and smack that "young whippersnapper", like I have never wanted to hit anyone before. I had just turned 35! Apparently that's consider old for pregnancy??

So if 5 kids wasn't enough to put me off having more, the idea of being referred to as geriatric again, quite frankly, has put an end to me longing for more children!

Back to the iron holder.

Supplies:
An old frame
Paint
Fabric - I ended up going with a different fabric, this piece was a bit small
An Iron Holder
Heat and Bond
Drill/Screws

Sanded and painted the frame


Cut the fabric to fit and applied the heat an Bond And I ironed the fabric to the wall ( I found this tip on another blog, but I can't remember which one, so if it's you and you feel brave enough to admit you had a hand with this, let me know and i'll make sure you get credit)


Then I screwed the iron holder to the wall.

I tried to attach the frame with 3m hooks, which I usually love but they kept falling off (heat maybe) so I hot glued it, which was great, until it melted off the wall. So eventually I glued it with E6000. I mean I really should have known the glue would melt, it's an iron! I swear I do have a brain - I know this seems unlikely.

And here it is, a framed iron holder, warning wonky pictures because once again the laundry is hard to get into, but it is straight, not a sloping ceiling issue.


DIY Delight or Disaster? Attaching issues aside, I think it's a delight, what do you think?

Thanks for reading

Mel xo

Tuesday, 28 August 2012

Lies, Damn Lies and Butter?

We all know the saying Lies, damn lies and statistics, and I have to tell you, I'm a stats junkie. So I'll get into that but first up here's my next "offering", a formula can redo. Hardly exciting or difficult and the result, it's a butter project.


Back to stats, in my former life as a working gal, I lived and breathed stats. Loved them, analyzed them and used them to increase my productivity and that of my employees.

Of course as a new blogger, I was thrilled to discover a new set of stats to devour. I was pleasantly surprised to discover a number of hits from an unrecognized URL. So immediately I marvel at my own genius and that the world suddenly had decided that massive ironing boards were in fact, the latest thing and everyone wanted to gaze enviously at the ABIB. Right away I'm thinking  patents, copyrights, royalties, should I offer a measure and quote service at an inflated price and when should I start researching factories to produce them in bulk.

Sadly for me, this was not the case, it seems some disgusting spammer goes around looking for new sites in the hope that our vanity will lead us to click on their crappy site, so that we can be bombarded with even more spam from their sister sites filled with malware & viruses. As you can imagine, I wasn't a very happy camper. So warning if you're not sure on a referring site, google them!

How does this relate to butter?

Well today's project is what I like to refer to as a butter offering, or spelled correctly but-ahh.
If you don't know what it means, it's when you see something from far away and you go, oh that looks great then you get up close and you screw your face up and think, "but-er" no, no it's not.

Today I decided to recycle or upcycle some formula cans. Which brings me to ask, what the heck is the difference between recycling and upcycling? Was it just a trendy way to make turning your rubbish into something else, sound a little more exciting?

Anyway, I have a million and one formula cans and thought I'd make a few canisters.

Supplies, all on hand:

Formula can
Paint - I used the left overs from the stencil wall
Vinyl
Svg files, and if anyone's interested, if I can't get free files, I get them from Lettering Delights, because it's already in my software program, I'm using Make the Cut and they're only a couple of bucks.


First I gave the cans 3 coats of paint


Cut my files, then trying to weed the stupid vinyl ( when things go wrong, always blame the tools) I lost all the letter holes (you know, like the semi circle from the e)


 I decided to touch them up with a sharpie and from far away they look alright, but-ahh, up close, they're kind of gross. You see craft bloggers, I hop around your sites looking at how you turn your garbage into pretty, functional items, leading me to think "I can do that", turns out, I can't.

Wanna see what I mean?

DIY Delight or Disaster?

Disaster, but since they're on top of the shelf, my little But-Er cans will do!

Thanks for reading

Mel xo


Monday, 27 August 2012

Mother Guilt? Game on!

Look what I made for my older boys!


Today I shipped my first born baby off to a foreign country. It actually hit me harder than I thought it would, I was feeling sick once he walked through the departure gate.


He on the other hand used my fears to guilt me into making him something.

If you happen to spend any significant time with younger teenage boys, you'll know that they really only have two things on their mind, Xbox and food. The latest must have game for my boys is Skyrim.


 A few weeks ago I made the babies and Elizabeth blankets and Samuel says to me, "So if you're not girly, little or cute, no one wants to make stuff for you." It was in the morning before school and my reply was along the lines of "Just get ready, we need to leave".

Then I got to thinking, the he's right, since the boys started high school, I rarely make them anything at all, and I have an attack of the mother guilts. 

Gauntlet thrown and I picked it up - like a boss! 

So today I was at the supermarket and as I was leaving they had these two water bottle at the register marked down. Thus the Skyrim water bottle was born!

Supplies:
Water Bottle
Vinyl
Cutting machine

I googled the Skyrim logo, and got the PDF here, if your interested in Skyrim you have to check out what they used the image to make it's AMAZING. Not telling what it is, you have to see it to believe it!

First I re sized and cut it on my machine, then transferred, how easy is that!

So when the boys got home from school, I asked them to close their eyes and hold out their hands, like I used to do with them when they were little, they obviously gave me the eye roll for being such a dork, and  I placed them in their hands.

When they opened their eyes, Samuel says "Oh wow that's mad", which I translated to, he liked it and I got an "awesome" from Jack. This is huge, apart from their ove of food and games, when they got to high school they forgot how to speak.
These days all they seem to do is mumble and it drives me CRAZY!


I truly hope they like them, because this is as close as they're getting to me paying for the actual Xbox game.

DIY Delight or Disaster?

A delight, simple, easy and cheap.

Are your kids (or husbands) gamers? Do you have a roster or rules associated with time limits or days they can play?

 Personally I find them annoying, but then I'm a Mum that's my job.

Thanks for reading, now I better get back to the laundry, you know I love to procrastinate.

Mel xo


Saturday, 25 August 2012

Mellywood's Mantra


I woke up to a gorgeous sunny winters day and inspite of the sun I was feeling a little depressed with my disastrous first attempt at trying to build the Laundry Station. All I could think was, what am I doing, but I couldn't give up because, I'm a huge believer in teaching my kids by example and really if it was them wanting to give up after THREE attempts at doing something I would be on their backs like a snail shell.

Jule's keeps telling me it turned out fine and who cares about the fact I had to saw, but truthfully I've been missing being employed. It's the time of year when everyone is getting their performance reviews and bonuses and here I am at home feeling like a failure, who can't use a ruler. So I slob around in my misery, and go off to clean up the million pieces of sawed off wood, thinking "back on the horse", then I mutter, "don't you mean sawhorse?" (speaking to yourself - totally normal!)

Then the new Mellywood Mantra was born, and so when the babies went for their nap, I got to work.

Supplies - I forgot to take a picture, my bad!
  • Frame
  • Paint - I used left overs from the basket wall
  • Paint brush
  • Mod podge
  • Glitter Cardstock
  • Vinyl/cutting machine
  • Spray Adhesive
  • Scrap wood
  • A Positive Attitude


I sanded the frame and gave it 2 coats of paint.


I cut the glitter card to size sprayed with adhesive and slapped it on

Painted the wood scrap, I was about to sand it flat but then decided it considering why I was doing this I would keep it as is.

Cut my letters, and applied them

Cut the horse and Mod Podged it on, I was going to use a sawhorse but they looked kind of boring, then hot glued it to the frame


Tada, a sparkling awesome reminder personal reminder that I only fail when I don't finish.


I'm going to pop her in the laundry, because let's face it, with a family of 7 most of my day is spent in there.

When you start anything new (like DIY, ahem) things will most likely go wrong somewhere but it's getting back on the the horse that will see you through.
Public service announcement complete, now back to your regular scheduled viewing.

Also go here to see my favorite personal reminder craft, it's an even better lesson - and stalk her blog you won't be sorry!


DIY delight or disaster? This one is a pure delight, what do you think?

Thanks for reading,

Mel xo

Friday, 24 August 2012

No more Bob the Builder for my kids!!!

I've previously mentioned that I am not afraid to pick up power tool, I've used a drill to put up a shelf, which my husband may or may not have asked "Is that straight or does the ceiling slope in here to?" I'm blaming the ceiling, he gave me an out.

So deciding to build a proper laundry station complete with it's own little shelf, seemed like a fairly easy task. Ummm, if your sensing things weren't quite that easy, you would be right. I should also say, that I "build" these things while the hubs is at work, during the babies nap time, but truthfully if he saw me "during the process", I suspect divorce papers would be soon served!

The Laundry station.


I want you to pay close attention this is pictorial evidence that the bible is indeed correct and pride does come before the fall.

So here's our supplies:

  • Paint - I used Taubmans Whisper White
  • Bead board to fit the back
  • Wood for the frame
  • Support beams
  • Drill
  • Assorted Screws
  • A Brain - I didn't use one but it would be a massive help!


I started by measuring the bottom posts/ support beams, marked the cut line.


Then I drilled and screwed together the frame


By this stage, I'm thinking WOW, I'm like a building natural, perhaps I inherited this ability from my very dear, departed grandfather, (who I'm sure is rolling in his grave).

So I thought I must show how important it is to select the correct screw (totally stole from Better Homes and Gardens TV show)

Now, after sharing this with you, I'm about to die of embarrassment.

I screw the support beams onto the brackets, then off to paint the bead board. After it's dry I grab Samuel, my eldest child, into the Laundry and together we connect the back and I screw it on. Then I place Australia's biggest ironing board, henceforth to be known as ABIB on top.

Looking good hey???


Well looks can be deceiving, apparently since I left work I've lost the ability to count. I was out by nearly 20 cm ( about 8-9 inches) ARRRGG, how can I be so stupid, by this time it's 10:30 pm and I'm going out of my mind.
 I figure it's probably time to go to bed.


Jules had a breakfast meeting this morning and left early, so I got up to get a start before the kids got up. I measured again, got the hacksaw out and cut.  I get the ABIB back in the laundry and low and behold - I had measured up wrong again and still needed to remove about 10cm (4 inches). Just in time for the school run.

I'm just about ready to lose it, so I strapped the little ones in their chairs in front of the telly, with a cupcake each, to keep them quiet for 15 minutes so I can finish, not my proudest Mummy moment - stop judging me!

I pick up the saw and blaring out from the TV, is the theme song to Bob the Builder and I all can hear "Can we fix it" and let me tell you that condescending little English builder and his crew yelled out their response, it very clearly could be heard as "yes WE can" mocking me as I sawed.

It took me about 20 minutes to finish and 200 new gray hairs but she's done!


Now that's she's done I love her, she has already made a huge difference.

I'm really looking forward to decorating her, I'll be Pinteresting for some idea's, because what legit craft blogger doesn't want to see their gorgeous ideas butchered by someone else.


 I've also begrudgingly forgiven Bob and the crew for their insensitivity during the process, because he was an effective baby sitter for so many years!                                          


DIY Delight or Disaster, well the process was a massive fail but on the whole I'm delighted. The ugly taps have been hidden and for that I'm grateful.

What do you think, Delight or Disaster? Oh and any "decor" tips would be fantastic.

Thanks for reading.

Mel xo


Thursday, 23 August 2012

Grab your boarding pass....Australia's Biggest Ironing Board

I'm taking you on an adventure to Ironing land. Where the most tedious chore in the world can be made a little more fun, grab your boarding pass and come ride Australia's Biggest Ironing Board!


Here in Australia we love BIG, in fact my kids have a book of all the big tourists attractions, you know there's the Big Banana, Big Pineapple and there are many more but my personal favorite,because it's just sooo insane is this, The Big Prawn


So my patriotic side insists that I must go big, and the Mellywood Mantra is "What you lack in talent, make up for in size!


Anyways I saw this on Pinterest and thought it was a brillant way to get rid of the ironing board which is ALWAYS, in the way!


But I wanted one to fit across all the machines so it could double as a bench to fold the washing.
One problem, my machines are not the same height, it's at this point I have to let you know that the dishwasher lives in the Laundry simply because there is no room in the kitchen and hand washing dishes, it's not my thing.


So, I decided to make a board that would fit across all three machines

Australia's Biggest Ironing Board!


Getting supplies should have been the easiest part of this project, sadly this was not to be the case, Jules and I set off with just the babies to grab some wood. When we got there, Max, who is usually a very easy going baby, starts to scream, to the point where we just left.

In the car park, Julian picks him up and says I think he's pooed, I look up from putting Madeleine in her seat and I scream! Not only is Max covered in it but so is Julian, the poor mite had come down with gastro and it was everywhere. Julian starts dry retching, it starts pouring with rain, I'm trying to clean Max, in the back of the car, he wont stop crying and wriggling.

I get Max in the car and then Jule's points at me, I look down and I'm covered in you know what!

So after we scrub up and attend to Max, I got my supplies:


Fabric for the cover
Heat & bond
Sewing Machine & Accesorries
Wooden Board to fit across the machines
Old quilt - or quilt batting (cotton, not synthetic)
Digital Cutter for the shapes
Staple Gun/ Staples
Hot Glue Gun


First I cut the various shapes for the Ironing board cover and ironed them on to the white squares.


Then I sewed the squares together, Added a boarder, ran out of fabric so I added another one.

Then I took the quilt and hot glued it onto the board, then stapled it down. You want to make sure that it's pulled tight!


Then I hot glued the cover over that, in retrospect if I had of thought it through I would have been better off, sewing velcro and velcroing it down, but I'm a DIY newbie so, live and learn!

And here she is

Australia's Biggest Ironing Board!!!!


The reason she looks a little wonky as well as the ripples you can see, are a result of having my boys hold it up, it's REALLY heavy - if you look closely you'll see Samuel's hand.


For me, this is going in the diary as a Delight!

I'm loving the fact that I have a huge space to fold and sort the clothes and I love the little shapes.

Let me know what you think, DIY Delight or Disaster??

Thanks for reading,


Mel


Wednesday, 22 August 2012

A New Beginning

It's a new beginning for my Laundry.

Here she is


I hate laundry although I may get this dress, it should help right?


I'll stop rambling on and get to the point, The Laundry

I've been on Pinterest drooling over some awesome Laundry Rooms, obviously I'm a DIY newbie so I wanted to start small, and I ended up with this, a stenciled boarder (I had to stand in the kitchen to take the photo so it's not great)


I gathered up some supplies:

Vinyl and SVG file
Paint/Brushes

Cut my vinyl and stuck it on the wall, in the picture it looks like it's sloping, it's not the ceiling is, just another little quirk, ahem


I painted 2 coats of paint


and tore it off


And with much mucking around I managed to get a photo of it


So, what you think, be honest, does it go down in the diary as a delight or a disaster? Personally I like that it has added some colour but I'm not 100% sold on it, I guess I'm going to have to wait and see how this room pulls together before I can make a judgement call. Oh and if you want to see what I'm drooling over, check out my Laundry Board

Thanks for reading,

Mel xo


Related Posts Plugin for WordPress, Blogger...