Adsense


Monday, 29 April 2013

INSPIRATION CAFE RECIPE LINK PARTY - Recipes from your Heritage

Hello,

We are so excited over at the Inspiration Cafe today, we are holding our first ever Link Party


You've seen all the fabulous recipes from our Heritage and now it's your turn, come and share a recipe that means so much to you. This is an opportunity to be featured across the social media pages of 6 blogs as well as sharing your memories and pride.


Just click on the cafe and join the party


Friday, 26 April 2013

Knitting Organizer


Morning All,

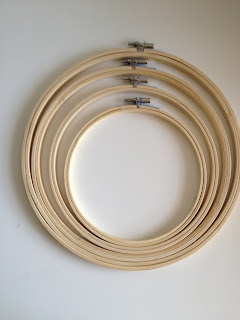
After I made the quilt and go, I knew that I needed to do something similar for my knitting, I'm a fickle person and bored easily so I like to have a few things on the go at once. I used the another of the embroidery hoops I received from Wholeport


Supplies

  • Fabric
  • Bias Binding
  • Sewing supplies
  • Quilt batting


Grab your fabric and cut into strips, the width will depend on the hoop size you use, and how long you want it


Sew the strips together and attach the quilt batting and inner fabric


Fill with your latest knitting project


Hang her up


Just like my Quilt and go, I can grab it at nap time or bed time and clickity clack the night away.

DIY Delight or disaster? Well I'm delighted! I love Wholeport's embroidery hoops, Elizabeth has been on Pinterest and wants some in her room for decoration, I plan on buying a few sets. The best part is, Wholeport's prices are based on how many you buy, the more you buy the cheaper they become.

Thanks for reading,

Mel xo


I would be delighted if you would follow me at any or all of these awesome places, just click on the picture below.


Mellywood's Mansion
Mellyood's Mansion
Mellywood's Mansion

Tuesday, 23 April 2013

Quilt Organizer


Morning All,

The good folk at Wholeport sent me another package of craft goodness in the mail, every bloggers dream, Embroidery Hoops


Over my holidays the weather finally turned cool, the clocks went back and the nights have become long and I wanted something to hold my quilting. I needed something can just grab and go as soon as the little ones go off to bed, so here is my grab and go quilting organizer.

Supplies:


First up I cut 3 circles, then cut down the fabrics to make the pockets


Sewed on the bias binding


Filled it with my quilting goodies.


Then hung it up ready to grab once them babies have hit the hay.


DIY Delight or Disaster? Oh I am delighted, don't forget to check out Wholeport for all your embroidery needs. Super cheap and come back later this week for another hooptactular project.

Thanks for reading,

Mel xo


I would be delighted if you would follow me at any or all of these awesome places, just click on the picture below.


Mellywood's Mansion
Mellyood's Mansion
Mellywood's Mansion

Monday, 22 April 2013

Inspiration Cafe Heritage Food - ANZAC Biscuits - Mellywood's Mansion

It's week 5 of our Food From Our Heritage Series at the Inspiration Cafe.  This week I'm sharing a recipe  that represents the pride of Australia.


Head on over to the cafe and learn a little about the Aussie's in World War One and how this easy little biscuit came to represent home to many a soldier.  You know the drill....just click on the Cafe door below and I'll take you there.
If you have a recipe from your heritage or one that has special meaning to you or your family, we'd love it if you would write a post about it and share it at our first ever link party at the Inspiration Cafe, beginning April 29.  It will be fun to see what everyone shares! 

Friday, 19 April 2013

It's A Party..No It's Two....and it's not 1999


Once upon a time in the last millennium Prince alluded to the fact that 1999 would be the most amazing time to party. I spent my teenage years dreaming that I would be 23 in Italy, dressed in the best the fashion capitol  of the world had to offer and gorgeous Italian men would be supplying me with exotic cocktails.

In reality I was pregnant with my second child and it was the hottest of hot Summers, there were power strikes and we weren't even allowed to put on our air conditioners. Well finally I get to live part of my dream. The Tongue in Cheek girls are bringing you Total Couture Tuesday on April 23 2013.

We want to show the world how fabulous we are....in our yoga pants, pj's paint splattered tracksuits or whatever the heck you really wear! So celebrate the slob that you have become since that day you pressed publish on your blog and forgot how to dress in pretty clothes take a pic and load it up.


Then April 29, there is another slightly less fashionable but oh so special party happening over at The Inspiration Cafe. We have been showing off dishes from our heritage or from our country and we hope you will share your most precious dish.

So join me, hey it's not hot Italian men but it might include a yummy pasta or pizza
Thanks for reading,
Melxo

He Said He Was Bored - Reusable Kitchen Wipes


This is one of those projects that has been on my "I have to do this one day" list. And to be honest it would have stayed on that list until I got around to doing the kitchen because I am not sure what I want done in there, until Samuel told me he was bored. Here's how I did it

Supplies:
An old but clean towel
Scrap Fabric
Velcro
An old cardboard tube from the last roll you should ever buy.
Vinyl (optional)
Sewing supplies

I had just run out of kitchen wipes again and looking for a cloth when he announced there was nothing to do, I don't know why but I grabbed an old box and told him to cut me a 10 inch square. Then I took that and just traced around it and cut them out.


I also had some red fabric left from ages ago when I made the elmo nappy/diaper stacker and it's not great fabric so I thought it would be perfect and cut that.

I serged/overlocked them together but you could sew and flip them out the right way and added velcro.

Then I took the tube and wrapped it in vinyl and hot glued some velcro to attach the wipes to

Joined them up.


And rolled


So far so good


Stuck it on the roll and called it done.


DIY Delight or Disaster? To be honest they are really functional and way more handy than their paper counterparts, but When I do this to match the kitchen I will make sure my cotton matches and I will do a strip of velcro rather than the two side because it leaves a bit of a gap when pulling on the roll. So I'm not completely happy but I know they are worth it so I'm on the fence with this one.


Thanks for reading,

Mel xo

I would be delighted if you would follow me at any or all of these awesome places


Mellywood's Mansion
Mellyood's Mansion
Mellywood's Mansion

Wednesday, 17 April 2013

A Happy Accident - Knitted Necklace Scarf


Hi All,

Well it seems like ages since I last posted. The kids enjoyed their time off and to be honest so did I. It was lovely to just sit and take a breather. I also have to thank the lovely ladies of the Inspiration Cafe who so very kindly sent me the awesome guest posts that kept you guys entertained while I was away. In fact they surprised me with them, you might remember I was going to bombard you with old guest posts and out of date holiday projects.

Anyway happy accidents, I have had plenty of those, namely the majority of my children, but there have been others as well, like this scarf.

You see I was planning on making this gorgeous cowl from Adele over at Mammy Made for a friend and whenever I am knitting something for someone else I like to give it a go for myself, just to make sure I iron out any issues I might come across. This is a simple stocking stitch but it's done with HUGE needles and it has been so many years since I had used needles of that size that I thought a practice run was necessary  Thank goodness because it turns out that the ball I bought was way too small.

I couldn't get another ball so I cast off and I shoved it in a bag and lazily threw it in with my jewelry making supplies. Then the second week of my holiday I did a massive clean out of my craft room, don't think I wont be showing that off, and light bulb moment the knitted necklace scarf was born.

Wanna make one???

Supplies:

  • 50 gram ball (small ball) of 8 ply wool
  • Size 20 needles
  • Sewing Needle
  • Scarf Bail
  • Bead and jewelry findings

How to make a Knitted Necklace Scarf:

  1. Cast on 20 stitches 
  2. Knit in Stocking Stitch until you have just enough to cast off.
  3. Cast Off 
  4. Slide the Scarf Bail on
  5. Sew the two ends together
  6. Attach a complementary bead
I shifted the scarf bail around so that it covered up the stitched in ends.


DIY Delight or Disaster? Oh such a delight!  Bring on Winter!
Thanks for reading,

Mel xo


Be Delighted Every Day, Follow Mellywood's Mansion!
project-name-for-SEO-purposes-here


Monday, 15 April 2013

Inspiration Cafe - TRADITIONAL FOOD SERIES: DANISH KIRSEBAERKUGLER

Well, we're up to week 4 of our Food From Our Heritage Series at the Inspiration Cafe.  This week Danni from Silo Hill Farm is sharing a recipe that's hard to say, so easy to make and has a hidden surprise in the center!
 A couple of these and would be great with a cup of coffee or maybe even a latte.  Come on over to the Inspiration Cafe and learn just where this recipe comes from and how easy it is to make.  You know the drill....just click on the Cafe door below and I'll take you there.
If you have a recipe from your heritage or one that has special meaning to you or your family, we'd love it if you would write a post about it and share it at our first ever link party at the Inspiration Cafe, beginning April 29.  It will be fun to see what everyone shares! 

Friday, 12 April 2013

Bottle Cap Jewelry - Blast From The Past

Morning All,

One more blast from the past, even though this was a holiday project by swapping out the images you can make this anytime. A really fun kid's craft during the school holidays.

*********************************************************************************


Happy Monday,

It's Mel from Mellywood's Mansion here today and I'm sharing a quick easy and very cute Valentine gift.

I have to admit I'm not huge on Valentines Day and don't usually do much, but my daughter has just started the new school year and she is feeling a little nervous about new classes, teachers and friends, so I thought I would make her something to cheer her up a bit.

Supplies:

  • Flattened Bottle caps - (buy or make your own)
  • Epoxy Dots
  • Bottle cap images I bought these ones here
  • Paper
  • Jump rings
  • Clasp
  • Double sided tape
  • 1 inch punch


1. Attach the clasp to two bottle caps using the jump rings, then add the caps to fit wrist, for Elizabeth who is a tall 10 year old, I used 6. 


 2. Using the double sided tape, stick down the image and place the epoxy dot over the top


It's that easy, and since I had a few more images I added a pendant and a key ring to her little gift.


Playing with bottle caps is so much fun and you can make them to fit anyone. Personally I wouldn't give them to anyone younger than four, in case of choking but I guess it depends on the child.


Thanks for reading

Mel xo

Don't miss any Delights or Disasters, follow Mellywood's Mansion at one or all of these delightful places

Mellywood's Mansion
Mellyood's Mansion
Mellywood's Mansion
Related Posts Plugin for WordPress, Blogger...